Using Circular Polarizing Filters

When taking photographs, why aren’t my skies ever really blue?
Why can’t I ever capture exactly what’s just beneath the water?
And why, on a clear day, does is appear that there’s a little more haze in my images than I can see through my viewfinder?
I ask myself the same questions when it comes to capturing windows, glass, objects with reflections, or even a stream of water.
My initial thoughts would be, well maybe there’s something I’m doing wrong in my settings perhaps. I check my aperture and the amount to light I’m letting in. There’s the ISO settings, but I hardly touch this setting in daylight pictures. But still, my skies usually come out as a bit too bright when capturing landscape- even with the sun behind me.
And if this isn’t the issue – my only other option would be the post editing work that I may need in Photoshop. Perhaps I could use the Curves tool, or another filter to tweak my skies, along with a layer mask – but how would this handle any issues with reflections, refraction, or objects that can’t be seen underneath clear water?
It was when I was flipping through my dslr camera manual and YouTube for some advice that I came across an interesting topic about Polarized Light and it’s effect on my photographs.
What is Polarized Light?
After researching this topic, I discovered that there are different effects on light and the way it’s seen when it passed through or reflects off certain objects or material. For example, light can become polarized when it’s passing through a surface of water – which would make sense.

The same is true when light is reflected off non-metallic surfaces. Reflective surfaces can also produce unwanted glares when taking photographs, and cause other issues, like obscuring underwater objects if I’m photographing a scene near water, or cause my blue skies to appear too bright, even if the sun is at a good angle.
These issues of unwanted polarized light can be resolved and controlled by using a polarized filter, which can absorb the distorted light and help reduce the amount of glare and reflections, and enhance the tones in some of my images, like my blue skies actually turning out to be blue.
Possible solution: Circular Polarizing Filters
These are filters that can be applied to the front of your dslr camera lens in order to darken skies and deal with other issues, such as reflections and glare from different surfaces, like lakes or the sea.
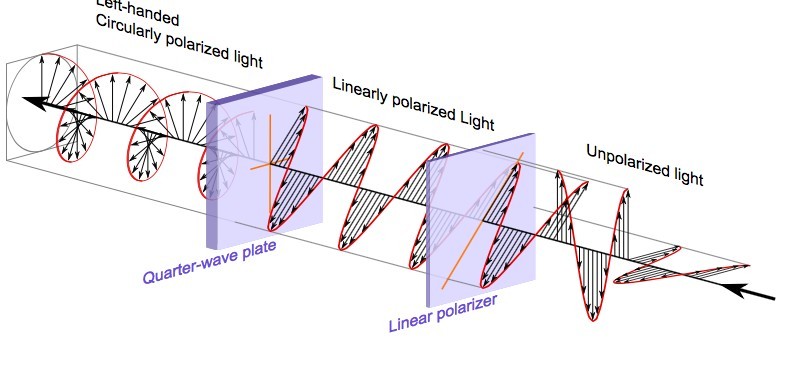
The interesting thing that I discovered from my research was that this light only partially linearly-polarized – which sounds even more complicated to me. But in simpler terms, the orientation of this polarized light only vibrates in one direction. This means that a linear polarizer can be used to actually change the balance of the light in the photograph.
This is where a circular polarizer would come into play, when you apply them to your lens. They have the ability to rotate after you screw them on. This allows you to adjust your filter to the direction of the light.
They contain a linear polarizer which performs this function when you rotate the filter, along with a quarter-wave plate which transforms the polarized light into circularly-polarized light before entering the camera. This was an eye-opener for me, particularly in learning how light works when entering the lens.
Using my Circular Polarizing Filter
I have before and after shots here, experimenting with my Circular Polarizing Filter attached to the front of my camera lens. As you can see, there’s a HUGE difference between the two photographs with the amount of saturation, and vibrant color tones – particularly in the foliage and shadows.

Now could I have achieved this effect in Photoshop? Possibly with a lot of extra work and layers – but maybe not as crisp and accurately as this.
Here is my second photograph comparison taken before and after applying my CPL filter, and you can see the differences. First, the sky is evidently bluer and darker when applying the cpl filter, and I can actually see the clouds.

The other difference would be the color on the surrounding trees and bushes, along with the reflections in the building. It’s also apparent that the trees are a bit darker in the second image compared to the first. So I’m thinking, is this the actual color of the foliage on these trees and the brightness in the first image is due to the haze? Or did I simple need to rotate my CPL ring on my lens?
Also, the reflections in the glass window appear to be similar in this particular condition. The second picture’s glass reflections are darker, though the reflections in the first appear to be much clearer.
Vivitar Series 1 CPL filter
The CPL filter that I am starting out with is for a 58mm lens and it does just about what it says in the product review: removing unwanted reflections from water and glass, along with improving color saturation, clarity and contrast in my images.
Now I’m sure there are many brands and types of CPL filters out there, which I’m open to giving a try. But so far, this particular CPL filter seems to be doing the simple trick for me, in improving the subtle details that I’ve mentioned above, and providing some marginal protection for the lens – a subject that I discussed in an earlier post concerning UV Filters.
Now I’m sure there are other ways around these issues as I mentioned earlier – like attempting to tweak these changes in Lightroom or Photoshop – but there are some changes that you can’t quite manipulate, like seeing past the reflections over the surface of water. Another difference that I noticed in the above images is the increased saturation, which may makes the tones come out a bit too strong in some instances.
My verdict?
So this is my first circular polarizing filter and the results are looking promising. At least, compared to my previous images before I started using this filter. Now I’m not going to get carried away with this one and just leave it on my lens permanently, because even from the few shots that I’ve taken so far, it’s evident that there are instances where I wouldn’t want to use a CPL, if there’s too much saturation in the shot.
I’m curious to hear everyone’s opinion and feedback on this.
Thanks!


1 Comment
Dan Strong
Hi Isaiah,
Thanks for this super helpful post! I have been taking my own pictures for about a year for my blog and while the pictures come out good enough, they are never anything particularly special. I knew (and still know) almost nothing about photography so I am a total amateur but I can’t believe the difference that the circular polarizing filter makes in the picture quality. The ones you showed are like night and day. I definitely have to look into getting one of these. Thank you so much for telling me about them with this post! I have to save this one for sure.